Tuning our engines and constantly making them perform better is nice… but we should also never forget to maintain them properly and assure reliability. And I’m not talking about trivial things as oil filters, spark plugs etc.

hydraulic lifter
Today I’d like to focus on servicing our lifters. The valve lifters. Our cars normally have either solid or hydraulic type lifters.
The former is a more sporty and performance-oriented one. It is a solid connection between the camshaft lobe and the valve. To eliminate play between the two components, we need to add shims with the correct thickness. That’s kind of extensive, but it rewards us with amazing rpm-capabilities. Solid lifters are normally (depend. on design) ready for rpm in excess of 9’000.
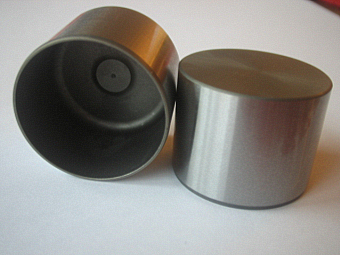
Solid lifters
The hydraulic lifter is very common in low-power engines but also in some of the awesome JDM powerplants that we all love (e.g. SR20, RB25, 4G63). The hydraulic design benefits from self-correction of the valve play. This means, the lifter adjusts the valve play constantly by the help of the engine’s oil pressure (-> hydraulic). So normally there is no need to service those lifters. But as our engines get older and already have run lots of KMs when we buy them, there is the possibility of oil deposit in the lifters. This can make them „tick“, not bleeding correctly anymore. The minimal valve play manifests in that „ticking“ sound. In a low power daily driver, I wouldn‘ bother too much. Maybe change the oil once or twice.
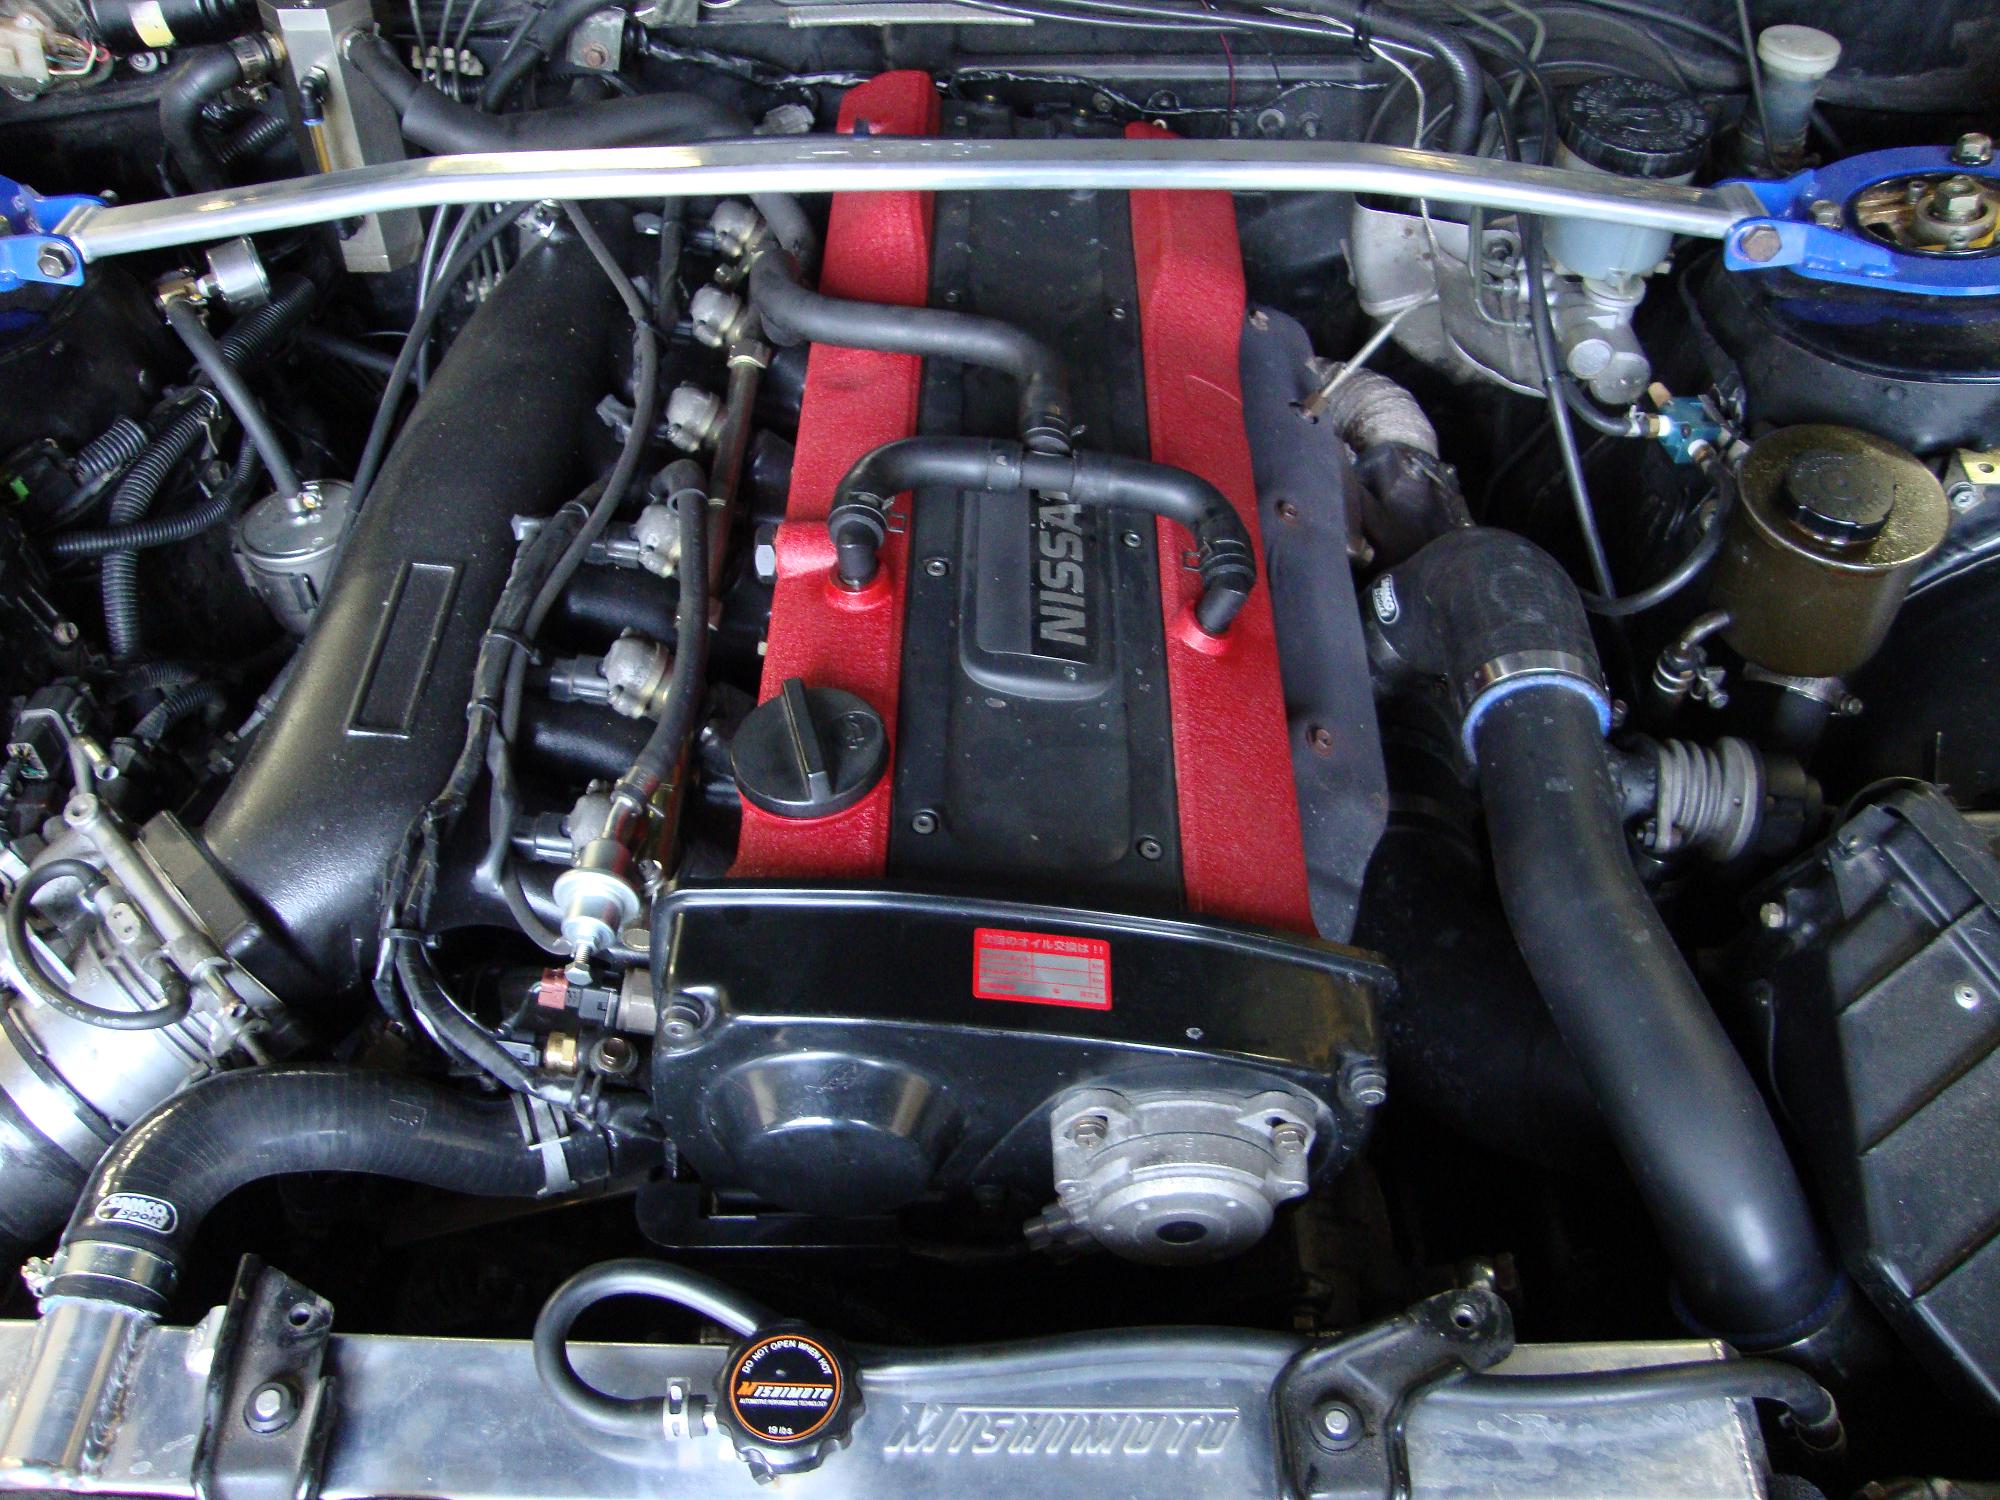
The RB25DET features hydraulic lifters
But as we tend to increase horsepower and rpm of our engines, the lifters become a reliability factor. They on the one hand are very comfy and easy to install, but on the other hand unfortunately suffer from limited rpm capabilities. Due to their design, they are physically not able to properly correct the valve play beyond a certain rpm level. This depends from engine to engine, and can normally only be found out by trial and error…

The 24 lifters are directly actuated by the camshafts
Good luck we can very often rely on the experience of others. In the case of the RB25, it is known, that its lifters can handle approx. 8500 rpm. This, assumed that the valve springs and retainers are upgraded (vs. valve float) . It is obvious that the lifters need to be in a perfect condition to cope with this kind of stress. So we decided to remove all the lifters and clean them properly upon installation of stronger valve springs and retainers.

After we removed the camshafts, the 24 lifters could be easily taken out of their guides.

In the above picture you can clearly see where the lifters are working and the valves they are pushing down below them.
Now the following writeup shall help as a guide on how to clean and inspect your „hydros“ on your own engine. Since the Nissan hydro design is a very common one, this procedure will apply on a big part of the different lifters out there.

All you need is a few basic tools, approx. two liters of thinner (nitro) and a suitable vessel to bathe your lifters in.

Once you have them out and on your bench, best is to sort them according to their original position in the cylinder head. It is not proven that you cannot swap the lifters in different guides but it is also not vitiated! I tend to put things back to where they have originally been and have been working perfectly up to now.

Best is to take one lifter after another and disassemble it on a dry and clean surface. You don’t want to bruise its vulnerable surfaces.
The hydro lifter basically consists of the lifter casing (the outside housing) and the lifter body (the inserted pivot). The casing guides the lifter up and down and takes the hits by the camshafts. The lifter body extends from oil pressure and corrects the valve play.

The lifter body is held in the casing by a secure spring. In order to get it out of there, you’ll need to overcome the pressure of the spring. You could try to pull the body out with a plier, but that could harm the lifter body’s surface. Best is to use mass inertia to get it out properly (pic above): Hit the whole lifter assembly on a flat and hard surface (use some paper to guard the thin wall of the casing from bending) until the body pops out of the casing. This will need some exercise, as it does not come out easily! You will know that the lifter body is unlocked when it levels with the lower end of the casing. Check this after each hit.

This is how it will look after a successful hit! The lifter body is now ready to be removed.

You can easily pull it out with a plier.

After shaking the casing a few times, a small pad will fall out. The picture above shows, what you should have in front of you by now.

Now take apart the lifter body. It’s easy, just pull the two apart. On the left is the casing of the lifter body, then a spring and on the right the lifter valve. The valve has a small pellet in it, so the oil can be bleeded and the valve clearance is corrected automatically.

Now do the same thing with all your lifters. Make sure you keep them in the correct order and don’t mess with the small parts!

You can now put them in the vessel (keep the order!!) and drown all of the parts with thinner. I hope you still know, which assembly goes to which valve in the cylinder head! You should leave the parts in there for 1-2 hours.

After having the parts let dry and blown out with compressed air, you can do the extra mile.

Take a piece of Scotch Brite and rub the important surfaces. The casing has three of them; the top where the camshaft is working on, the sides and the inner bore where the lifter body is moving. Do the same with the casing of the lifter body. In the end blow away all residues with comp air.

Before reassembling the lifter, a very important step is to be performed. You need to bleed the lifter body. If you don’t, it is possible, that the lifters „tick“ again and this for a long time until oil pressure bleeds them.
Put the spring in the lifter body casing as shown above.

Fill it up with fresh motor oil, but leave about 3-4mm to the top of the casing.

Put in the lifter valve in the above shown direction. It cannot be pushed down, so take a needle tool and carefully press on the small pellet at the bottom while pressing it down with two fingers. Oil will immediately pour out and the valve will sink into the casing.

Bubbles of air will also come out of the valve, this is what you actually want. Push the valve (with the help of the needle tool) to the very bottom of the casing. Once arrived there, carefully let it go. The valve will start to come up again and suck back in the poured-out oil until the end of the spring rate. Make sure, remaining air bubbles aren’t sucked back in again. If this is done properly, the lifter body is now ready to be installed.

Test it by putting the small pad on it and tryin‘ to compress it. The lifter body should now be absolutely incompressible, hard as a stone. If not, repeat the procedure. If you fail even after 2-3 times, the lifter valve is broken…

Now put the lifter body back into the casing as shown above. Remark: This is a pain in the ass!

The clearances are as tight as a drum, this means you’ll have a hard time pushing the lifter body in against the secure spring pressure. One degree odd and it won’t go in…

Once you did succeed in that, you’ll have only 23 of them left… haha
After reinstallment, your lifters should no more make „ticking“ sounds and work for another 100’000km or more… 🙂
-ChrisTuning our engines and constantly making them perform better is nice… but we should also never forget to maintain them properly and assure reliability. And I’m not talking about trivial things as oil filters, spark plugs etc.
hydraulic lifter
Today I’d like to focus on servicing our lifters. The valve lifters. Our cars normally have either solid or hydraulic type lifters.
The former is a more sporty and performance-oriented one. It is a solid connection between the camshaft lobe and the valve. To eliminate play between the two components, we need to add shims with the correct thickness. That’s kind of extensive, but it rewards us with amazing rpm-capabilities. Solid lifters are normally (depend. on design) ready for rpm in excess of 9’000.
Solid lifters
The hydraulic lifter is very common in low-power engines but also in some of the awesome JDM powerplants that we all love (e.g. SR20, RB25, 4G63). The hydraulic design benefits from self-correction of the valve play. This means, the lifter adjusts the valve play constantly by the help of the engine’s oil pressure (-> hydraulic). So normally there is no need to service those lifters. But as our engines get older and already have run lots of KMs when we buy them, there is the possibility of oil deposit in the lifters. This can make them „tick“, not bleeding correctly anymore. The minimal valve play manifests in that „ticking“ sound. In a low power daily driver, I wouldn‘ bother too much. Maybe change the oil once or twice.
The RB25DET features hydraulic lifters
But as we tend to increase horsepower and rpm of our engines, the lifters become a reliability factor. They on the one hand are very comfy and easy to install, but on the other hand unfortunately suffer from limited rpm capabilities. Due to their design, they are physically not able to properly correct the valve play beyond a certain rpm level. This depends from engine to engine, and can normally only be found out by trial and error…
The 24 lifters are directly actuated by the camshafts
Good luck we can very often rely on the experience of others. In the case of the RB25, it is known, that its lifters can handle approx. 8500 rpm. This, assumed that the valve springs and retainers are upgraded (vs. valve float) . It is obvious that the lifters need to be in a perfect condition to cope with this kind of stress. So we decided to remove all the lifters and clean them properly upon installation of stronger valve springs and retainers.
After we removed the camshafts, the 24 lifters could be easily taken out of their guides.
In the above picture you can clearly see where the lifters are working and the valves they are pushing down below them.
Now the following writeup shall help as a guide on how to clean and inspect your „hydros“ on your own engine. Since the Nissan hydro design is a very common one, this procedure will apply on a big part of the different lifters out there.
All you need is a few basic tools, approx. two liters of thinner (nitro) and a suitable vessel to bathe your lifters in.
Once you have them out and on your bench, best is to sort them according to their original position in the cylinder head. It is not proven that you cannot swap the lifters in different guides but it is also not vitiated! I tend to put things back to where they have originally been and have been working perfectly up to now.
Best is to take one lifter after another and disassemble it on a dry and clean surface. You don’t want to bruise its vulnerable surfaces.
The hydro lifter basically consists of the lifter casing (the outside housing) and the lifter body (the inserted pivot). The casing guides the lifter up and down and takes the hits by the camshafts. The lifter body extends from oil pressure and corrects the valve play.
The lifter body is held in the casing by a secure spring. In order to get it out of there, you’ll need to overcome the pressure of the spring. You could try to pull the body out with a plier, but that could harm the lifter body’s surface. Best is to use mass inertia to get it out properly (pic above): Hit the whole lifter assembly on a flat and hard surface (use some paper to guard the thin wall of the casing from bending) until the body pops out of the casing. This will need some exercise, as it does not come out easily! You will know that the lifter body is unlocked when it levels with the lower end of the casing. Check this after each hit.
This is how it will look after a successful hit! The lifter body is now ready to be removed.
You can easily pull it out with a plier.
After shaking the casing a few times, a small pad will fall out. The picture above shows, what you should have in front of you by now.
Now take apart the lifter body. It’s easy, just pull the two apart. On the left is the casing of the lifter body, then a spring and on the right the lifter valve. The valve has a small pellet in it, so the oil can be bleeded and the valve clearance is corrected automatically.
Now do the same thing with all your lifters. Make sure you keep them in the correct order and don’t mess with the small parts!
You can now put them in the vessel (keep the order!!) and drown all of the parts with thinner. I hope you still know, which assembly goes to which valve in the cylinder head! You should leave the parts in there for 1-2 hours.
After having the parts let dry and blown out with compressed air, you can do the extra mile.
Take a piece of Scotch Brite and rub the important surfaces. The casing has three of them; the top where the camshaft is working on, the sides and the inner bore where the lifter body is moving. Do the same with the casing of the lifter body. In the end blow away all residues with comp air.
Before reassembling the lifter, a very important step is to be performed. You need to bleed the lifter body. If you don’t, it is possible, that the lifters „tick“ again and this for a long time until oil pressure bleeds them.
Put the spring in the lifter body casing as shown above.
Fill it up with fresh motor oil, but leave about 3-4mm to the top of the casing.
Put in the lifter valve in the above shown direction. It cannot be pushed down, so take a needle tool and carefully press on the small pellet at the bottom while pressing it down with two fingers. Oil will immediately pour out and the valve will sink into the casing.
Bubbles of air will also come out of the valve, this is what you actually want. Push the valve (with the help of the needle tool) to the very bottom of the casing. Once arrived there, carefully let it go. The valve will start to come up again and suck back in the poured-out oil until the end of the spring rate. Make sure, remaining air bubbles aren’t sucked back in again. If this is done properly, the lifter body is now ready to be installed.
Test it by putting the small pad on it and tryin‘ to compress it. The lifter body should now be absolutely incompressible, hard as a stone. If not, repeat the procedure. If you fail even after 2-3 times, the lifter valve is broken…
Now put the lifter body back into the casing as shown above. Remark: This is a pain in the ass!
The clearances are as tight as a drum, this means you’ll have a hard time pushing the lifter body in against the secure spring pressure. One degree odd and it won’t go in…
Once you did succeed in that, you’ll have only 23 of them left… haha
After reinstallment, your lifters should no more make „ticking“ sounds and work for another 100’000km or more… 🙂
-Chris